Creating a Bootable USB Drive
USB drives are the new replacement for CDs and DVDs. Following is information on how to make your own bootable USB drive:
With the death of the DVD drive, USB drives are becoming the new standard for copying files or installing software. In fact, most computers being sold today do not include DVD drives and software companies such as Microsoft now have ways to install their operating systems and application programs using USB drives.
Making a bootable USB drive allows a user to boot from the drive instead of the operating system that is on the computer. A bootable USB drive is useful in the following situations:
- Installing or Reinstalling an Operating System – To install or reinstall an operating system, you will oftentimes need exclusive access to the hard drive.
- Testing a New Operating System – A bootable USB drive with an operating system will allow a user to test another operating system (ex. Linux) without having to remove the existing operating system on the computer.
- Removing a Virus or Trojan from a Computer – When a computer is heavily infected or has a very bad virus or Trojan, sometimes the only way to remove the virus or Trojan is to boot from a USB drive and perform the scan and repair from this drive.
- Drive Imaging – Getting a complete image of a computer hard drive oftentimes requires exclusive access to the hard drive.
- Running Portable Applications – A bootable USB drive allows a user to run portable applications separate from the operating system. For example, you are staying at a hotel and you do not have a computer. However, a computer is available in the hotel’s business center. You could use the computer and login to your email. However, you do not know what software, monitoring software, or viruses are on this computer. Booting from a USB drive and running a portable web browser such as Chrome would protect you from anything that may be installed on this computer.
There are a number of utilities out there to format a USB drive including the format utility in Windows. However, the best application I found is the Rufus USB Formatting Utility. This utility allows you to not only format the drive for the different file systems but also different types of boot options. The Rufus USB Formatting Utility is a standalone program (does not require installation) and can be downloaded from the following link:
Once the software is downloaded, double-click on the program to bring up the interface.
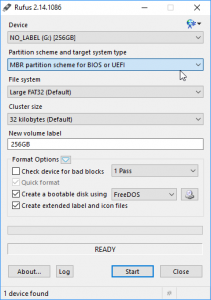
Under Partition Scheme and target system type, there are 3 types. To format the drive to be bootable by old and new types of computers, select MBR partition scheme for BIOS and UEFI. For new computers that use the UEFI bios to access a drive under 2TB, select MBR partition scheme for UEFI. For new computers that use the UEFI bios to access a bootable drive over 2TB, select GPT partition scheme for BIOS and UEFI.
Under File System, select one of the options below based on the following:
Large FAT32 (Default) – For a drive that can be used for PCs and Macintosh Computers (Macs). This is the default that most drives are formatted to from the manufacturer since it is the most compatible. However, this file format does not support files larger than 4GB in size.
NTFS – Can be used by both PCs and Macs but Macs cannot usually write to NTFS formatted drives. However, this format may not work with devices other than computers.
UDF – Universal Disk Format – This is a file format that works with all computer operating systems and supports files larger than 4GB in size. This is a good format to share files between Linux and other operating systems.
exFAT – Works on PCs and Macs and supports files larger than 4Gb. However, this format may not work with devices other than computers.
Once you are finished, select Start to format your drive. Once you are done you should test the drive by rebooting your computer and going into the BIOS to set the USB drive as the first boot device. Some of the newer computers allow you to select the Boot Menu on startup by depressing F12.